Appendices
Appendix-A
Python Scripting for DJMol Applications
Since DJMol uses Python for its scripting (and in ASE), a basic knowledge of Python (version 3) is h ighly appreciated. This appendix is based on the book, Think Python 2nd Edition by Allen B. Downey (Creative Commons Attribution-NonCommercial 3.0 Unported License). Some familiarity with programming is assumed for this appendix.
How to use Python within the DJMol?
To use DJMol, Python is a mandate tool and it should be installed. For this, you have to install the Python (windows version 3 or later) immediately after the installation of the DJMol program into your system. See Appendix - 3 for its details (including the details of running a python in the DJMol)
Basics of python scripting
Python is designed as an interpreter language and it is widely used in scripting purposes. It supports both procedural and object-oriented paradigm.
Variable assignment and Operators
In Python variable assignment is performed by, = operator. It also provides operators, which are special symbols that represent operations like addition or multiplication. The operators +, -, /, and * perform addition, subtraction, division, and multiplication, respectively. And the operator ** performs exponentiation; that is, it raises a number to a power. An illustration (hopefully self-explanatory!) of these commands are following (here, >>> string represents a command prompt; for the comment one can use #).
>>> x=5
>>> x
5
>>> x+2 # a comment
7
>>> x-2
3
>>> x*2
10
>>> x**2
25
>>> x%2
1
>>> x/2
2.5
Note that in numerical computation one need to use integers and decimals. Though it doesn’t require explicit declaration of type of the variables, there may be times when you want to specify the type of a variable. This can be done with casting operation.
- Casting in python is therefore done using constructor functions:
int() - constructs an integer number from an integer literal, a float literal (by rounding down to the previous whole number), or a string literal (providing the string represents a whole number)
float() - constructs a float number from an integer literal, a float literal or a string literal (providing the string represents a float or an integer)
str() - constructs a string from a wide variety of data types, including strings, integer literals and float literals
>>> a=1

>>> type(a)
<class 'int'>

>>> b=3.1415

>>> type(b)
<class 'float'>

>>> a+b
4.141500000000001

>>> b**b
36.45491472872008

>>> y = int(2.8)
>>> y
2

>>> x = float(1)
>>> x
1.0

>>> z = float("3")
>>> z
3.0
String, List, Methods etc.
Apart from int, string type is also used in python. Its initiation is simple (you can use either ‘ or “ to make string):
>>> my_string = 'thisStringI'
>>> my_string
'thisString'

>>> my_string = "thisString"
>>> my_string
'thisString'
Like a string, a list is a sequence of values (perhaps it may be the Pythons most important built-in data type; unlike C or Fortran python does not have an Array data type). In a string, the values are characters; in a list, they can be any type. The values in a list are called elements or sometimes items. There are several ways to create a new list; the simplest is to enclose the elements in square brackets:
>>> a = 'is'
>>> b = 'nice'
>>> my_list = ['my', 'list', a, b]
>>> my_list2 = [[4,5,6,7], [3,4,5,6]]

>>> my_list[0]
'my'
Note that a list can be used as an Array (and its index starts from 0 and not from 1, like a C array).
List Manipulation Rules
>>> my_list[0]
'my'
|
Select the first item |
>>> my_list[1:3]
['list', 'is']
|
Select items at index 1 and 2 |
>>> my_list[1:]
['list', 'is', 'nice']
|
Select items after index 0 |
>>> my_list[:]
['my', 'list', 'is', 'nice']
|
Select items before index 3 |
List openrations
>>> my_list + my_list
['my', 'list', 'is', 'nice', 'my', 'list', 'is', 'nice']

>>> my_list * 2
['my', 'list', 'is', 'nice', 'my', 'list', 'is', 'nice']
Methods for the Lists
The Methods are equivalent to functions/subroutines; Since the List is an object a method for that list is called by a DOT (.) operator immediately after the Object name, as it is illustrated below:
>>> my_list.index(a)
2
|
Get the index of an item |
>>> my_list.count(a)
1
|
Count an item |
>>> my_list.append('NewOne')
|
Append an item at a time |
>>> my_list.remove('is')
|
Remove an item |
>>> my_list
['my', 'list', 'nice', 'NewOne']
|
It shows the appended List |
Libraries
In Python a good collection of libraries are available say, for doing math, or to do string/array manipulation, Numerical computations, graphics etc.
The math library of python can be imported like:
>>> import math

>>> math.sqrt(9.99)
3.1606961258558215
For ASE scripting, most of the times you need to use NumPy and Scipy libraries (and it is not shipped with standard Python, so one needs to install it, see the next appendix). If you installed NumPy you can call it like:
>>>import numpy Or >>>import numpy as np |
Importing NumPy Lib. |
>>> Array=np.array([[1, 2], [3, 4]])
|
Construct an array |
>>> Array
array([[1, 2],
      [3, 4]])
|
Print that array |
>>> np.transpose(Array)
array([[1, 3],
      [2, 4]])
|
Transpose of the matrix |
>>> Array.dot(Array)
array([[ 7, 10],
      [15, 22]])
|
Matrix multiplication |
Basics of ASE scripting
Hopefully one can be now understood ASE scripting. A sample ASE script is given below with some explanations. The aim is to calculate N2 molecular energy with EMT calculator (Effective Medium Potential, a crude empirical model generally used for testing purposes or for very large scale MD). Note that the following code has six lines (didn’t use line-breaker)
>>> from ase import Atoms
|
Import Atoms object |
>>> from ase.calculators.emt import EMT
|
Import EMT |
>>> d = 1.1 # Bond Length in Angstrom
    molecule = Atoms('2N', [(0., 0., 0.), (0., 0., d)])
|
Define a molecule with Atoms Object |
>>> molecule.set_calculator(EMT())
|
The molecule is attached with EMT |
>>> molecule.get_potential_energy()
|
Calculate PE (this Really invoke the EMT calculations) |
>>> print ('Nitrogen molecule energy: %5.2f eV' % e_molecule)
|
Printing the PE |
Note that the important step is to create the Atoms object - which is a collection of atoms. Everything else is based on this Atoms object (for example DFT calculators can be attached to this object to get DFT total energy).
A little more advanced example is following (an infinite gold wire with BL= 2.9A).
>>> from ase import Atoms
>>> d = 2.9
>>> L = 10.0
>>> wire = Atoms('Au',
           positions=[[0, L / 2, L / 2]],
           cell=[d, L, L],
           pbc=[1, 0, 0])
|
A list of generally used GET/SET methods for the Atoms Object is:
GET Methods |
SET Methods |
|---|---|
get_atomic_numbers() |
set_atomic_numbers() |
get_initial_charges() |
set_initial_charges() |
get_charges() |
set_chemical_symbols() |
get_chemical_symbols() |
set_initial_magnetic_moments() |
get_initial_magnetic_moments() |
set_masses() |
get_magnetic_moments() |
set_momenta() |
get_masses() |
set_positions() |
get_momenta() |
set_scaled_positions() |
get_forces() |
set_tags() |
get_positions() |
set_velocities() |
get_potential_energies() |
|
get_scaled_positions() |
|
get_stresses() |
|
get_tags() |
|
get_velocities() |
In essence, the Set methods are used to supply (the necessary) information for the Atoms object, whereas Get methods are applied to get useful information (usually after setting a calculator)
Appendix-B
Installation of Python and NumPy
As it is said before, one need to install Python (3.x, 64 bit) scripting language and NumPy on the system before the DJMol installation.
Using this tutorial, one is expected to get sufficient information on how to install a 64 bit version of python 3and NumPy on a WindowsSystem.
Python Installation
- First, download a 64 bit version of any 3.7.x from python.org. Clicking on the following link automatically downloads the required python
Install the above file with <pip> support, and for that select custom installation and check all the boxes in the Optional Features window.
Note: don’t forget to check (See next figure) “Add Python to environment variables” for accessing python using the command prompt.
Python Modules Installations
After installing 3.X Python in Windows, you can simply open a command window (using Administrative privilege) and type:
python -m pip install numpy
python -m pip install scipy
python -m pip install ase==3.17.0
python -m pip install matplotlib
To install numpy, scipy, ase and matplotlib libraries (note: it will install latest versions except for ASE).
(For a specific installation you can also do:
python -m pip install nameOfPackage==x.y.z ,
where x,y,z are version numbers)
NumPy Installation
If the above command: python -m pip install numpy fails, this method can be used to install the NumPy in Windows OS.
Disclaimer: Since NumPy doesn’t have an official build for windows, we’ll be downloading an unofficial version from https://www.lfd.uci.edu/ which is maintained by Christoph Gohlke, Laboratory for Fluorescence Dynamics, University of California, Irvine.
Download the .whl file of NumPy using the link to your Desktop. Clicking on the following link automatically downloads the required python https://download.lfd.uci.edu/pythonlibs/r5uhg2lo/numpy-1.16.1+mkl-cp37-cp37m-win_amd64.whl
If the file is not downloaded to the Desktop, Copy the <.whl> file to Desktop.
Note: If the above link is not working, goto
https://www.lfd.uci.edu/~gohlke/pythonlibs/#numpy
and download the 1.16.1 version of NumPy (Not Numpy-quaternion).
Then run command prompt as administrator: Type <cmd> in start menu and right click on command prompt and click on “Run as administrator” (See the next figure).
Navigate to your Desktop where the <.whl> file is saved. Type the following command in your command prompt and press Enter.
cd %systemdrive%\users\%username%\Desktop
Or manually find your Desktop path and enter like:
cd C:\Users\staff\Desktop
Install NumPy using the <.whl> file; Type this command in your command prompt and press Enter.
pip install “numpy-1.16.0+mkl-cp37-cp37m-win_amd64.whl”
Appendix-C
Windows Subsystem Linux in DJMol
For more advanced scripting/calculations one may want to use a real Linux operating system (instead of Cygwin emulators) in conjunction with DJMol. For this one can use WSL in the Windows 10 OS. It will give a real Linux OS and hence it guarantees a cent percentage of portability of C/C++ or Fortran codes into the Windows system.
Herein we give a short description of invoking of WSL in the DJMol platform (by assuming that you already have a WSL in your PC; otherwise it can be freely downloaded from Microsoft store, visit: https://docs.microsoft.com/en-us/windows/wsl/install-win10
Setting up the WSL
Update the Linux packages being used by WSL with the following commands in your WSL Ubuntu command window:
sudo apt update
sudo apt upgrade
sudo apt install unzip
sudo apt install ssh
Your Windows installation is probably already using port 22 for its SSH server, we need to change WSL’s SSH server to listen to a different port.
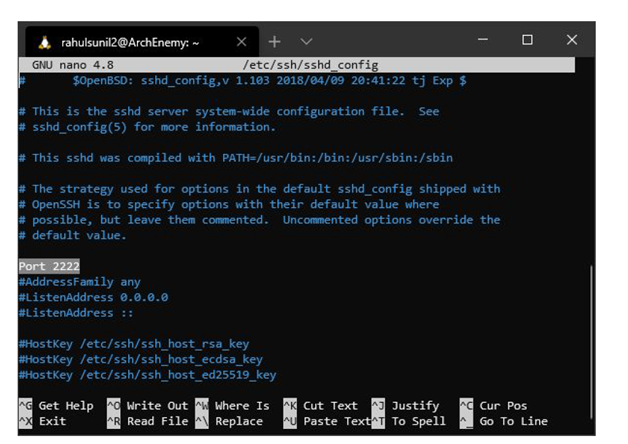
sudo nano /etc/ssh/sshd_config
Change the lines:
What ports, IPs and protocols we listen for
Port 22
to
Port 2222
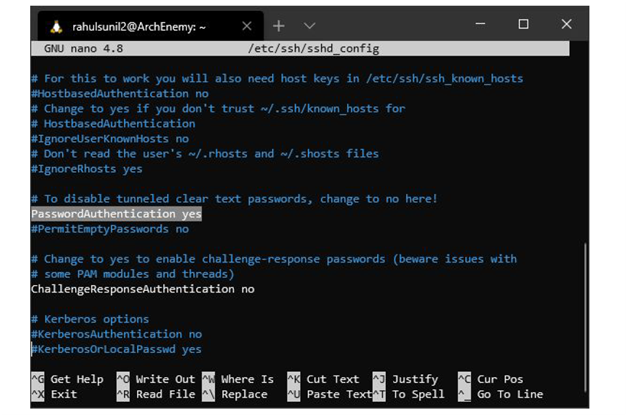
The WSL SSH server is initially set up to use key files for authentication. To allow authentication with passwords, change:
Change to no to disable tunnelled clear text passwords
PasswordAuthentication no
to
PasswordAuthentication yes
Use Ctrl-o to save the file. Use Ctrl-x to exit the nano text editor.
Before using the WSL SSH server you must stop and restart the SSH server. You will perform this step every time that you use WSL as the remote host from NetBeans. I suggest placing the command in a script file that you can execute.
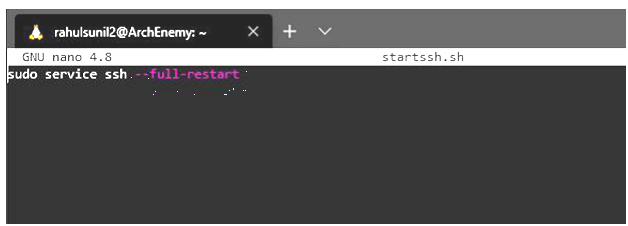
nano startssh.sh
Insert the following text into the script file:
sudo service ssh –full-restart
Use Ctrl-o to save the file. Use Ctrl-x to exit the nano text editor.
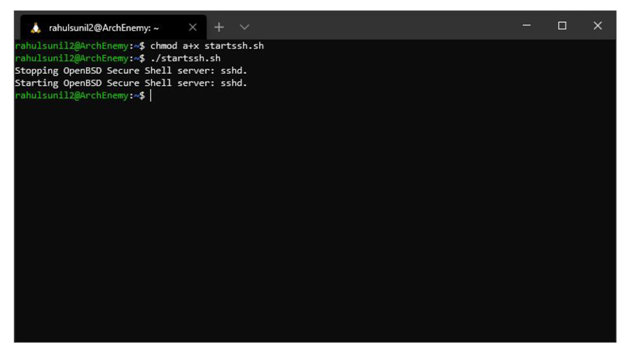
Back at the command line, use the following command to mark the script file as executable:
chmod a+x startssh.sh
To restart the SSH server, use the following command:
./startssh.sh
Setting up the Netbeans IDE
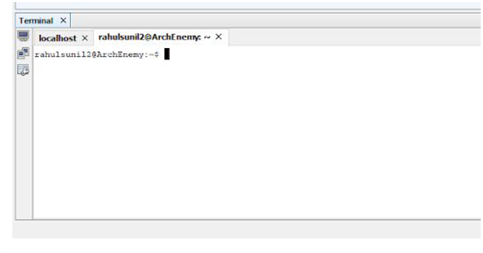
Open the Terminal and invoke the Terminal as:
Window → IDE Tools → Terminal
Create New Remote Terminal Tab.
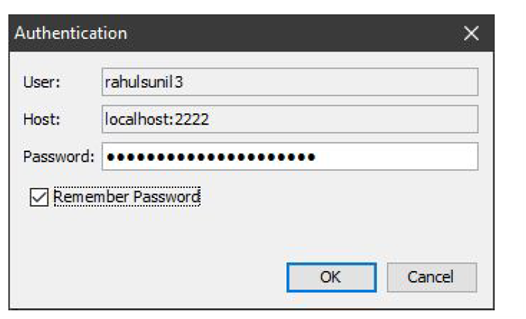
Enter your credentials.
User : <your-username>
Host : localhost
SSH Port : 2222
Click OK.
Choose Password.
Enter your linux password.
#Recommended: Check Remember Password box.
The process is finished; Now one can use WSL in DJMol
Appendix-D
Saved data
DJMol generate a number of text based temporary data, and these are nothing but a set of post-processing data from various visualizers or converters were temporarily stored in different directories and it can be used for a numerical comparison (for example, how MO levels of DFTB+ are different from that of Siesta for a given molecule). A list of such selected post processed files with its description is shown in the Table below.
PESScan2DPESscanmovie.xyz |
Geometries of molecules used for the PES |
PESScan2DPESscan.dat |
Energies and geometries of the PES |
PESScanView2DPES.dat |
Coordinates (initial, final step size) and PES energy |
SCRATCHMODFTB.dat |
MO energies in DFTB+ |
SCRATCHMOSiesta.dat |
MO energies in Siesta |
SCRATCHForceDFTB.dat |
Cartesian Force components in DFTB+ |
SCRATCHForceSiesta.dat |
Cartesian Force components in Siesta |
SCRATCHSCFSiesta.txt |
SCF convergence in Siesta |
SCRATCHUvdata_2.csv |
Fitted UV-Vis data |
SCRATCHUvdata_1.csv |
UV-Vis oscillator strength for the spectrum |
SCRATCHMDDFTBmovie.xyz |
Trajectory of MD in XYZ animation format |
SCRATCHTotalMD.dat |
Total energies of MD run |
SCRATCHKineticMD.dat |
Kinetic energies of MD run |
SCRATCHPotentialMD.dat |
Potential energies of MD run |
SCRATCHVelocityAC.out |
IR spectrum from MD using velocity autocorrelation |
SCRATCHDipoleAC.out |
IR spectrum from MD using dipole moment autocorrelation |
SCRATCHStdOrientation.xyz |
Standard orientation of the given molecule |
SCRATCHMullikenDFTB.dat |
Mulliken charges from DFTB+ |
Inputdftb_in.hsd |
DFTB+ script writer out file |
InputsiestaTEMP.fdf |
Siesta script writer out file |
ModesBinarymodes_in.hsd |
DFTB+ file used to construct vibrational data |
ModesBinarywaveplot_in.hsd |
DFTB+ file used to construct MO and its density data |
ModesBinarymodes.xyz |
DFTB vibrational modes and frequencies |
ModesBinary*.cube |
DFTB Cube files for MOs and Densities |
SiestaAppSiestaBinary.4.0CygWin64*.cube |
Siesta Cube files |
SiestaAppSiestaBinary.4.0.CygWin64SiestaVibModes.xyz |
Siesta (DFT) bands |
SiestaAppSiestaBinary.4.0.CygWin64BAND.bands |
|
SiestaAppSiestaBinary.4.0.CygWin64wannier.bands |
Siesta Wannier orbitals |
SiestaAppSiestaBinary.4.0.CygWin64wannier_*.xsf |
|
OpenMD. |
All OpenMD in and out files |
Database. |
All downloaded Structural files from online repositories |
Appendix-E
Demonstration Videos
Please visit: https://www.youtube.com/channel/UCNczegqwli6gnuo6eqNJSPg for Demo videos. The list is (as of October 2020):
Windows OpenMP settings | Executing Stand-alone DFTB+
DJMol Demo on Point Group Symmetry Detection
Running a DFTB Calculation from DJMol
Phonon Density of States (DOS) of Aluminium Bulk: DJMol + ASE Python Scripting
PES demo in DJMol (Linux)
Demo on Molecular Vibration of Water Molecule
Demo on Partial Charges And File Conversions
Generating/Displaying Molecular Orbitals in DJMol
DFTB+ Input script Writer in DJMol
DJmol/Netbeans : How to install ASE, Matplotlib with PIP
Adding Python Plugin in Netbeans or in DJMol
Siesta’s Charge density and/or electronic wave functions: 2D Contours/Surfaces
Siesta’s Charge density and/or electronic wave functions: 3D cube files
Remote Submission using SSH tool in DJMol (64v)
Band diagram and DOS (density of state) plot of Aluminum FCC
Molecular Dynamics Analysis
UV-visible spectrum in DJMol
Z-Matrix Structure Editor of DJMol
Wannier AddOn in DJMol (with Siesta)
DJMol Win64 Installation from its ZIP distribution File
DJMol Version Control with Github
Terminal use in DJMol
Building of DJMol with Netbeans 8.2 (Win64OS)
Radial Distribution Function from ASAP MD Calculation in the DJMol System
Burning of iso-octane fuel at 2500 K (molecular dynamics with DFTB+).
Appendix-F
Compiling/Installation of DJMol and its Add-Ons
General Information
A familiarity with programming using Netbeans IDE is assumed. All of the DJMol Program was compiled by using Netbeans IDE, v 8.2 (64bit) in Windows 64 OS. This program and all other mandate packages for compiling the software are available at free of cost and to download these packages please see: http://www.djmol.info/download.html
The needed Packages are:
JAVA 1.8 (jdk-8u201-windows-x64.exe)
Netbeans 8.2 (netbeans-8.2-javaee-windows.exe)
Python plug-in (2017-08-29-nbpython-nbms.zip)
Python 3.7.2 (python-3.7.2-amd64.exe)
Pip script (get-pip.py)
Numpy (numpy-1.16.0+mkl-cp37-cp37m-win_amd64.whl)
We also used (64 bit) the following Python packages with version numbers:
SciPy (scipy 1.2.1)
ASE (ASE 3.17.0)
Matplotlib (Matplotlib 3.0.3)
And these programs can be downloaded by using pip (use pip3) using a command window.
Compiling Main Program, <DJMolplatform>
Open the Project Directory, <DJmol Platform v2.1> and Compile and Build DJMol program. See the YouTube channel for its demonstration.
Then make a Zip Distribution (by Selecting project <DJmol Platform v2.1> followed by selecting <Package as>, <Zip Distribution>). A new <dist> folder will be created and it holds the Zip file.
Installing Program, <DJMolplatform>
Go to <dist> folder and unzip the file and Copy all the files/folders from the <Auxiliary> folder into <distdjmolplatform1>. This is shown in the demonstration.
Go to <distdjmolplatform1etc> and replace the following line in the <djmolplatform1.CONF> file:
default_options="--branding djmolplatform1 -J-Xms24m -J-Xmx64m"    to
default_options="--branding djmolplatform1 -J-Xms240m -J-Xmx640m"
To adjust the Resolution of the program Right click on <djmolplatform164.exe> then move to <Compatibility> tab and click on <Change high DPI settings> and Select the option “Override high DPI scaling behavior”.
Follow the instruction in the PathVariablesSetting.pdf file.
DJMol program can be now simply executed by double clicking <djmolplatform164.exe> which is located in <bin> folder.
Note that for the First Time of the execution, you may want to select, <Disable Modules and Continue> option. To fix this, you can try to clean your user-directory as it is mentioned in http://wiki.netbeans.org/FaqWhatIsUserdir
And once the application starts do the following (not mandate but it is useful):
Close <Start Page>
Close <Services>
Add <Windows -> Favorites>
Add <Windows -> Output>
Compiling Add-On Programs
See <AddOns_compilation.txt> in Add-On directory.
Setting Environment Variables for DJMol(Path, CLASSPATH)
To get proper functioning of the program one needs to set system variables (namely, PATH and CLASSPATH variables). Note that we use Windows 10 OS with all OS updates (as of June 2021).
First, get <Control Panel> and select <System and Security> option and then click on <System> option and click on <Advanced system settings>. This will give <System properties> window. Select <Advanced> tab and click on <Environment Variables>. See Figure below:
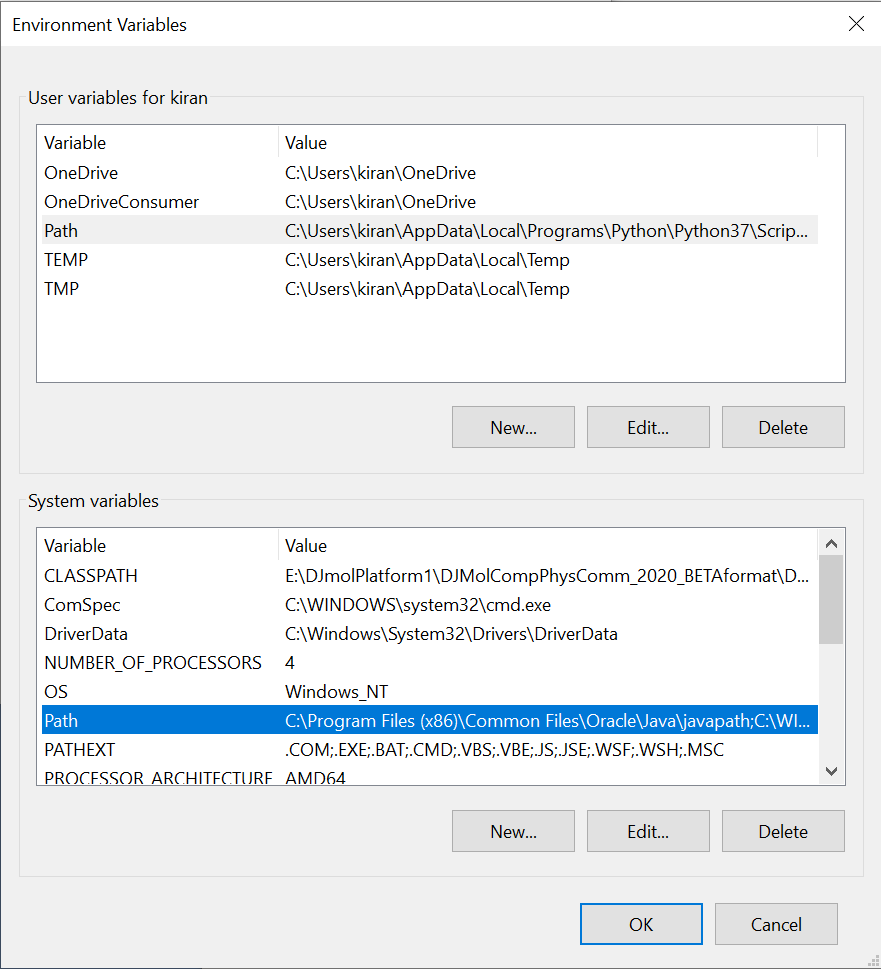
Control Panel settings
- There are three settings to be done.
In <User variables> append the <Path> variable with the full path of the <djmolplatform1> directory. See Fig. below:
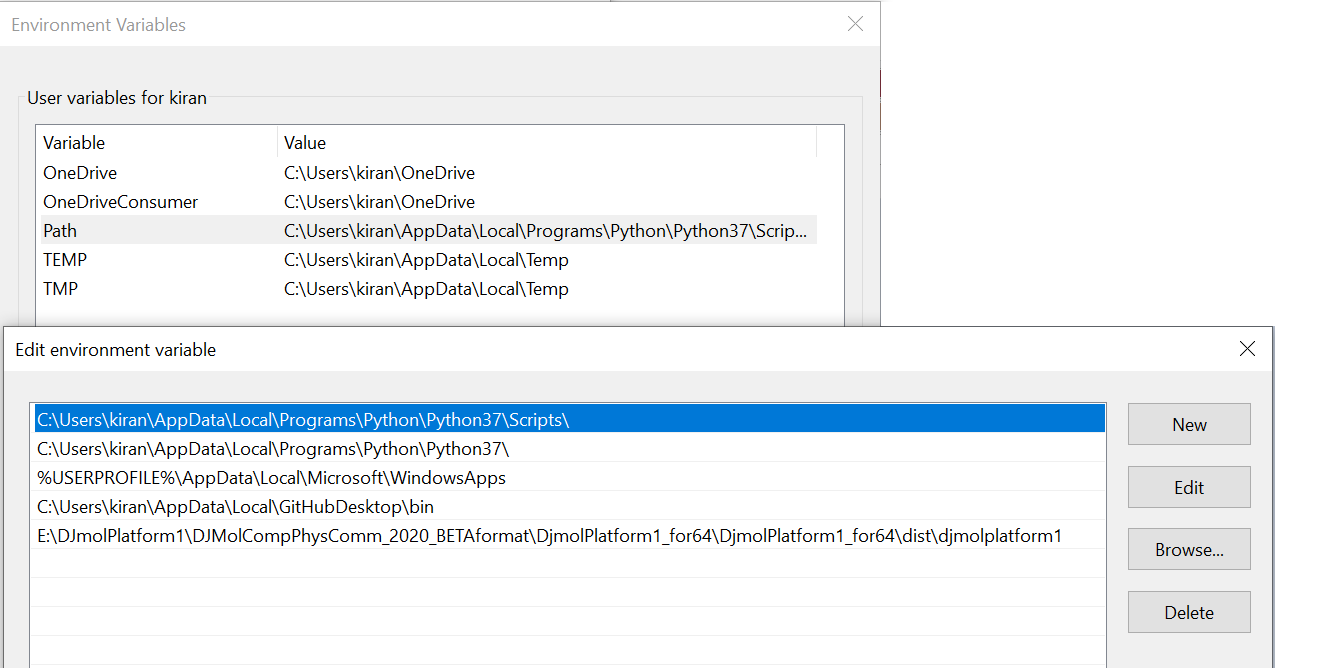
User Variable – Path; See last entry.
In <System Variable> section, add <CLASSPATH> and insert the <djmolplatform1> folder path name into it. See Fig. below:

System Variable setting – CLASSPATH
After that, look at <Path> variable, and check whether it include a javapath setting. See Fig. below:
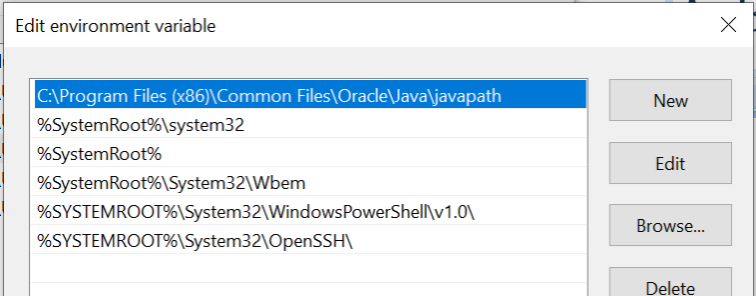
System variable setting - Path


